With its golden, crispy edges and naturally sweet cherry filling, this homemade Cherry Galette recipe is ideal for summer gatherings, special occasions, or whenever you’re craving a light and fruity treat.

Table of Contents
Ingredients and substitutions for Cherry Galette
- Plain flour: This is the best option for that flaky pastry, cake flour is not recommended here and if you live in a country with a plain flour protein content that is less than 10% (google should be able to provide this answer), it is best to use a bread flour to help give you a firmer pastry to work with.
- Butter: Cold and cubed helps you press it into your flour without heating it up too much as you work it. Make sure that butter is fully coated with flour so no puddles form during baking. Unsalted was used here as this is fresher than salted, however, you could absolutely substitute salted butter here.
- Ice water: Ice water helps the water not soak into the flour too much which helps the gluten form in the dough whilst giving you that flaky texture!
- Cherries: Fresh is best here as frozen would result in a soggy galette.
- Sugar: Superfine or caster sugar is best here thanks to it's fine texture that will help draw out the moisture in our produce whilst also dissolving perfectly.
See recipe card for quantities.

How to make Cherry Galette:
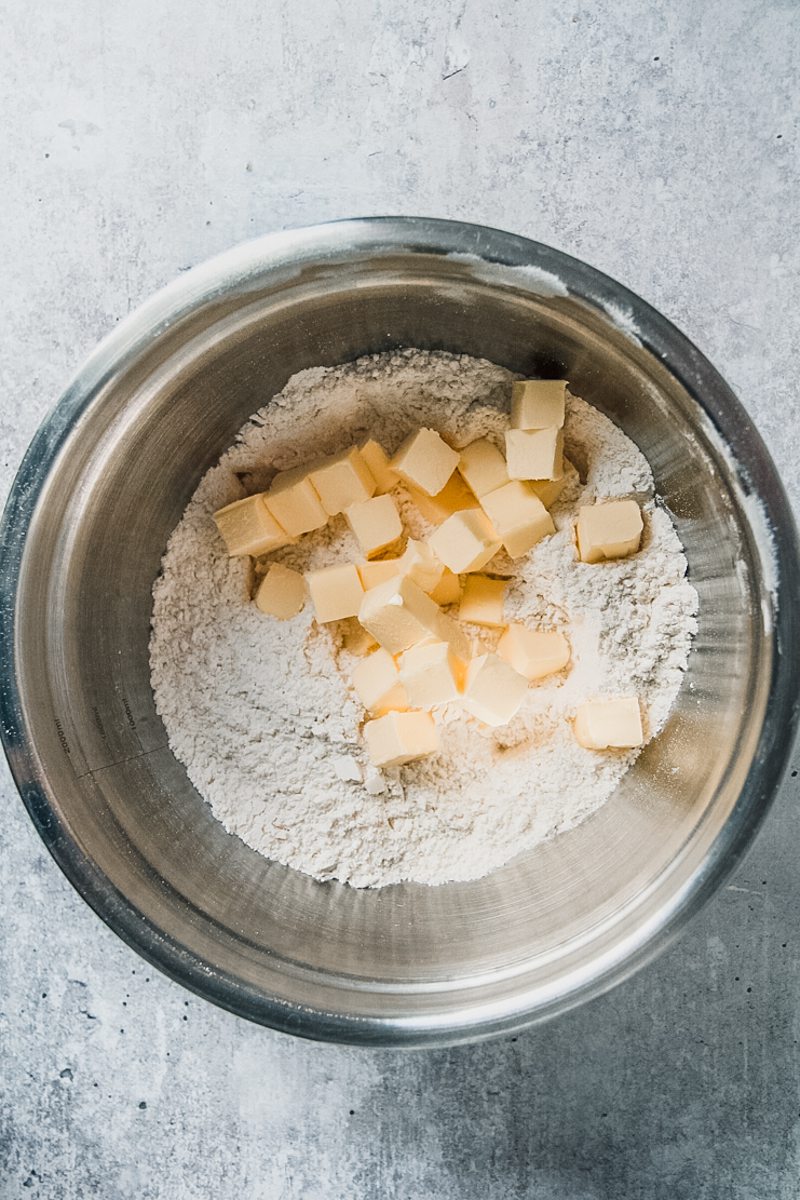
Step 1: Begin your pastry: Place the flour and salt into a bowl, stirring and then incorporating the cubed butter until it resembles large breadcrumbs.
Step 2: Ice water: Pour in ice water to form your dough until it holds together.

Step 3: Chill: Shape into a disc, cover and chill for 1 hour to rest.
Step 4: Roll out: On a lightly floured surface and to ¼ inch thickness and large enough to fit onto your baking tray.

Step 5: Assemble: Lay the cherries in the center and sprinkle over the sugar, folding and pressing the edges and sliding onto your hot baking tray.

Step 6: Bake: Until golden then cool fully.

Step 7: Serve: Once cooled, slice and serve with some scoops of ice cream.
More Cherry desserts you'll enjoy


Cherry Galette
Ingredients
Pastry
- 106 grams / ⅔ cup plain flour
- ¼ teaspoon sea salt
- 75 grams / 2.65 ounces butter chilled and cubed
- 45 milliliters / 3 tablespoons ice water
Filling
- 500 grams / 1 pound cherries pitted and halved
- 70 grams / ⅓ cup superfine/caster sugar
Instructions
Pastry
- For the pastry, place the flour and salt into a bowl and stir to combine.
- Add the cubed butter and toss through the flour to coat completely in flour.
- Press each cube between your fingers to thin out and continue tossing through the flour, trying to ensure the butter becomes no smaller than the size of peas.
- Add in a little of the ice water and stir to combine, continuing 1 tablespoon at a time until a dough forms, but ensuring it’s not too sticky, but that there are no dry portions in the base of the bowl.
- Press firmly into a disc, wrap and refrigerate for 1 hour.
- Preheat your oven to 200C/400F and prepare some baking paper the size of your baking tray and set aside.
- Place the baking tray into your oven to heat as you prepare the galette.
Assembly
- Lightly flour your surface and both sides of your dough and roll out to ¼ inch thickness.
- Flipping the dough and adding a small sprinkle of flour, where necessary.
- Slide the pastry onto the center of your baking paper, allowing overhang.
- Lay your cherries in the center of your pastry.
- Sprinkle the sugar over the cherries evenly.
- Fold over one edge of the pastry and work to fold and press the edges over the fruit, making sure the pastry is sitting flush against the filling.
- Remove your baking tray from the oven and slide the galette on top.
- Bake until golden, approximately 40 minutes.
- Allow to cool fully.
- Slice and serve with a scoop of ice cream.
- Enjoy!
Notes
- Cherries: Fresh is best here as frozen would result in a soggy galette.
- Baking tray: A baking tray that is heated in the oven prior to baking our galette for it’s nice flaky texture.
- Reduction of cherries: As the cherries bake they will go from being a mound to a much lower portion once baked, their flavor will also be more intense.
Nutrition
Subscribe to receive a free weekly newsletter using seasonal produce as well as exclusive content!
Made it and loved it?
If you have made this recipe, it would mean so much to leave a review below to help more people find this.

Alli
Love this recipe Sylvie!
Your picnic looked super gourmet and adorable, I wish I could've joined you! Hope your guests knew how lucky they were.
I'm defintely going to make these but with apples and/or blueberries. Miss you
Sylvie
Hey Alli, thanks so much for the kind comments. If you are ever over here then I will have to make them for you. Blueberries would be great, especially after blueberry picking! Miss you too 😉