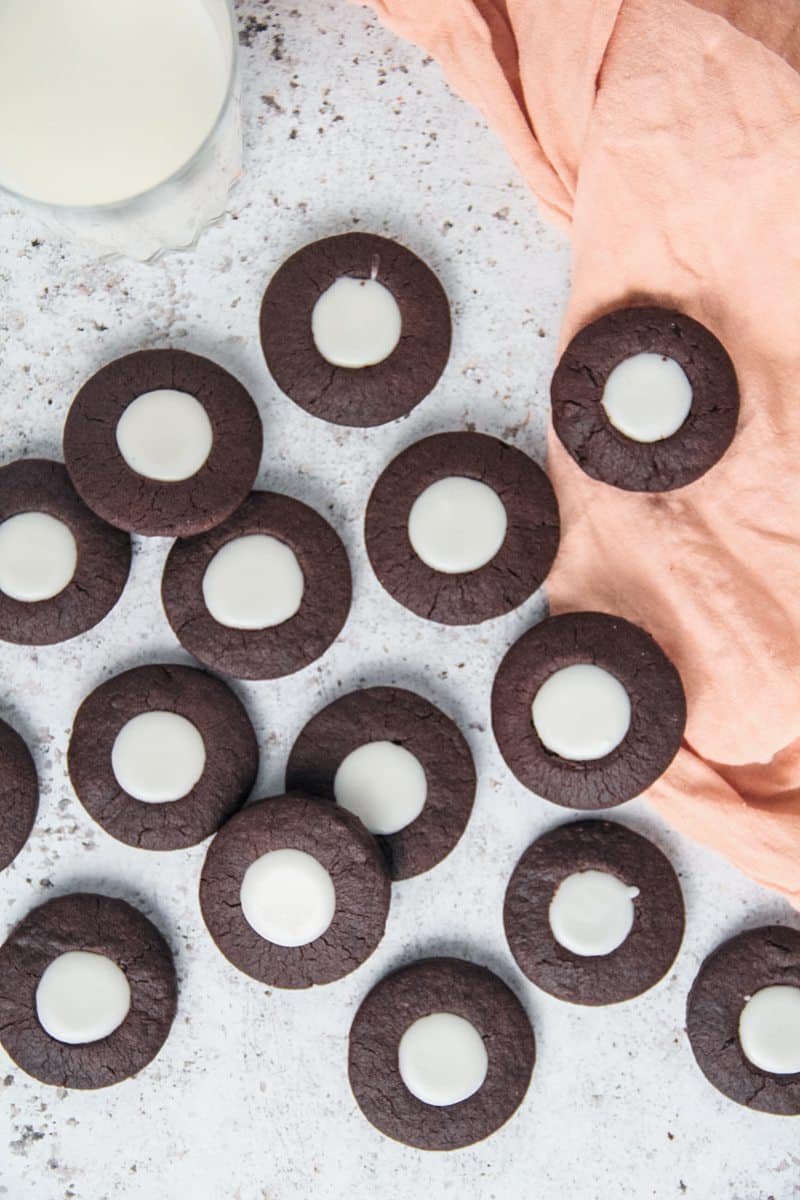
Enjoy these delightful Chocolate Mint Cookies, also known as a Mint Slice recipe. This classic Australian recipe features a buttery chocolate biscuit base, a peppermint cream filling and smooth chocolate coating. The beauty of a batch of these biscuits is how great they are as a quick pick-me-up or to share with loved ones.

Table of Contents
Something about biting into one of these homemade Mint Slice biscuits is far better to the storebought version most will know and love. Thanks to how simple each stage of the process is, this is a great recipe to try if you don't consider yourself much of a baker, but like giving it a go anyhow.
What is a Mint Slice?
Mint Slice is a popular Australian biscuit that features a delicious combination of a chocolate shortbread style cookie base and peppermint patty filling, all coated in a layer of chocolate. It is a classic treat that is loved by many for its irresistible taste.
History of Australian Mint Slice
The history of these biscuits is thanks to one specific Australian company named Arnott’s. They first began selling Australian Mint Slice in 1962 pairing mint and chocolate in a similar way to Girl Scout Thin Mints. Though they're a bit thicker for a real balance between the chocolate and peppermint flavors. Arguably not the most famous Australian biscuits, these are most definitely now a classic.

Ingredients and substitutions for Chocolate Mint Cookies
- Butter: Unsalted is best here to control the flavors, though it's okay if salted is all you have.
- Sugar: The best sugar here is superfine or caster which helps dissolve into the butter and creates a smooth consistency in the dough. Confectioner's or icing sugar works best for the peppermint patties. No substitute is recommended due to a fine sugar being needed to form that peppermint center that sit on top of the chocolate biscuit.
- Egg: As well as adding structure to the biscuit dough, the egg binds everything together so is essential.
- Cocoa powder: You will want a high quality cocoa powder for the best chocolate flavored biscuits here.
- Plain flour: Plain flour works best to create nice soft biscuits thanks to a lower protein quantity than bread flour. Using bread flour would result in cookies with a firmer consistency.
- Peppermint extract: Peppermint extract gives these mint biscuits their flavor punch and infuses the confectioner's or icing sugar
- Chocolate: Whilst dark chocolate is best here to really compliment the peppermint filling without being overly sweet. If you hate dark chocolate, you can substitute milk chocolate in equal measure.
See recipe card for quantities.

How to make Chocolate Mint Cookies:

Step 1: Whip: Cream the butter and sugar until fluffy, adding in the egg and combining.
Step 2: Sift the cocoa powder: Sift the cocoa powder and combine.

Step 3: Dry ingredients: Fold the flour in until a cookie dough has formed.

Step 4: Roll and wrap: Roll the dough into a log shape, cover and refrigerate.

Step 5: Slice: Remove from the fridge and slice into even round cookies.
Step 6: Bake: Place your biscuits on the tray and bake until fragrant and matte looking.

Step 7: Peppermint filling: Combine your peppermint filling ingredients until it holds together when pressed.
Step 8: Peppermint patty: Take a tablespoon amount and roll into a ball, flatten into an even patty and lay on top of one of the biscuits…repeat.

Step 9: Chocolate coat: Place the chocolate coating ingredients in a bowl and melt until smooth.
Step 10: Dip dip: Dip one of your biscuits into the chocolate coating nice and evenly and drain the excess.

Step 11: Set: Set your coated biscuit onto a tray to set and repeat with the remaining biscuits.
Step 12: Serve: Dig in and enjoy!
FAQ's for the best Chocolate Mint Cookies
As with most rolled dough you'll find that cutting your nice circles will begin to look rectangular the longer you hold the log of dough in the same position. The best process, if you slicing with a knife is to slice and roll, slice and roll. This action will keep the log round without thinning it out too much and will keep your cookies nice and round too.
The best method for your chocolate to set smoothly is to set your coated biscuit down onto a greaseproof paper lined tray to cool at room temperature.
You definitely can, these are best eaten within 5 days of making when kept in a covered container, if they're older than 3 days, keep in the fridge.
Absolutely! You can customize the Chocolate Mint Cookies by adding toppings such as crushed peppermint candies or even a dash of natural food coloring to the peppermint filling.
More cookie recipes you'll enjoy


Chocolate Mint Cookies
Ingredients
Chocolate biscuit
- 113 grams / 4 ounces butter room temperature
- 100 grams / ½ cup superfine sugar
- 45 grams / 1 medium egg room temperature
- 28 grams / ¼ cup cocoa powder
- 160 grams / 1 cup plain flour
Mint filling
- 170 grams / 1 ½ cups confectioner’s sugar
- 1 teaspoon peppermint extract
- 2 tablespoons water
Chocolate coating
- 200 grams / 7 ounces dark chocolate
- 1 tablespoon coconut oil
Instructions
Chocolate biscuit
- Cream the butter and sugar until combined and fluffy, approximately 1 minute with a hand beater.
- Add the egg and beat until well combined and the mixture looks smooth.
- Sift the cocoa powder into the mixture and mix until just combined.
- Add the flour and fold into the mixture until the dough looks smooth and no dry patches remain in your bowl.
- Turn onto plastic wrap and carefully roll into a log 2 ½ inches thick.
- Refrigerate for 1 hour minimum or freeze for 30 minutes.
- Remove from the fridge and preheat the oven to 180ºC/350F.
- Carefully slice the dough into 1 centimeter or ⅓ inch slices and place on a lined baking tray.
- Bake in the oven until the cookies look matte and are beginning to smell fragrent, approximately 10 minutes.
- Remove and allow to cool on the tray for 5 minutes.
- Carefully remove from the baking tray and repeat with the remaining dough.
Mint filling
- Meanwhile, to make the mint filling, combine the sugar, peppermint extract and water in a bowl until the mixture is moist and holds it together in your hand and feels slightly like putty.
- Remove a teaspoon amount and roll into a ball in your palm. Flatten evenly and lay on top of the cookie, ensuring it covers most of the top, but doesn’t touch the edge of the biscuits.
- Carefully press the edges of the filling down to hold it and repeat with the remaining mixture until all the peppermint filling has been placed on top.
Chocolate coating
- Place the chocolate and coconut oil in a bowl and melt on medium in either a double boiler or microwave until smooth.
- Place one cookie at a time into the chocolate, coating fully and draining to leave a thin coating of chocolate by holding up and draining on 2 forks.
- Place on a tray to set properly.
- Serve.
Video
Notes
- Chocolate: Whilst dark chocolate is best here to really compliment the peppermint filling without being overly sweet. If you hate dark chocolate, you can substitute milk chocolate in equal measure.
- Customize them: Feel free to add toppings such as crushed peppermint candies or even a dash of natural food coloring to the peppermint filling.
- Shaping the roundest cookies: As with most rolled dough you'll find that cutting your nice circles will begin to look rectangular the longer you hold the log of dough in the same position. The best process, if you slicing with a knife is to slice and roll, slice and roll. This action will keep the log round without thinning it out too much and will keep your cookies nice and round too.
- Setting your chocolate coating: The best method for your chocolate to set smoothly is to set your coated biscuit down onto a greaseproof paper lined tray to cool at room temperature.
- Storing your cookies: These are best eaten within 5 days of making when kept in a covered container, if they're older than 3 days, keep in the fridge.
Nutrition
Subscribe to receive a free weekly newsletter using seasonal produce as well as exclusive content!
Made it and loved it?
If you have made this recipe, it would mean so much to leave a review below to help more people find this.

Leave a Reply