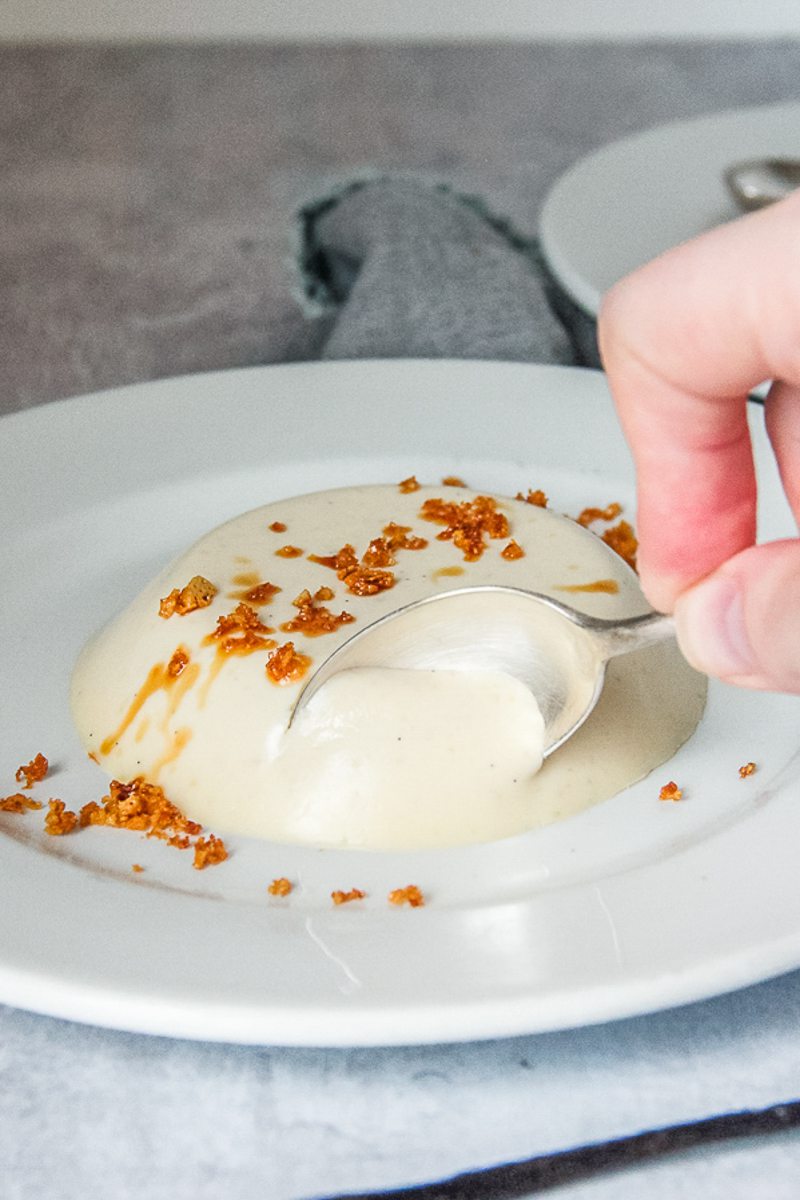
With its velvety texture and subtle floral notes, this Manuka Honey and Vanilla Panna Cotta pairs beautifully with honeycomb, fresh berries, a drizzle of extra Manuka honey, or a sprinkle of crushed nuts for added crunch.

Table of Contents
Ingredients and substitutions for Manuka and Vanilla Panna Cotta
- Vanilla bean: Vanilla bean or vanilla bean paste works perfect in adding bold flavor to this dessert. You could replace with 2 teaspoons of high quality vanilla extract.
- Cream: Heavy cream is used here to add a traditional element and weight to the liquid for the panna cotta to set as well as adding that beautiful texture. You could replace with pouring cream.
- Milk: Whole milk was used to help balance the richness of the heavy cream. You could replace with non dairy milk with a similar texture - such as coconut or oat.
- Sugar: Superfine or caster sugar is best here as add sweetness without additional flavor, though raw or light brown sugar would also work well.
- Manuka honey: This has an intense distinctive flavor, however, you could replace with heather or other intense honey that is locally available to you.
- Gelatin: Standard gelatin leaves available at supermarkets was used here, however, you could replace with vegan agar agar powder (this needs to cook until it has reached 85C/185F by using a candy thermometer and whisking after removing from the heat).
See recipe card for quantities.
How to make Manuka and Vanilla Panna Cotta:

Step 1: Soak: The gelatin sheets in water until soft.
Step 2: Heat: Cream, milk, sugar, vanilla seeds, Manuka honey, salt until simmering, thickened and the sugar has dissolved. Wring out the gelatin and whisk until smooth and only slightly jiggly.

Step 3: Pour: Into your prepared dishes and place in the refrigerator until set or overnight.
Step 4: Hokey pokey: Stir the sugar and golden syrup on low heat until the sugar has dissolved. Once simmering add the baking soda and stir swiftly and pour into the prepared tin to set.
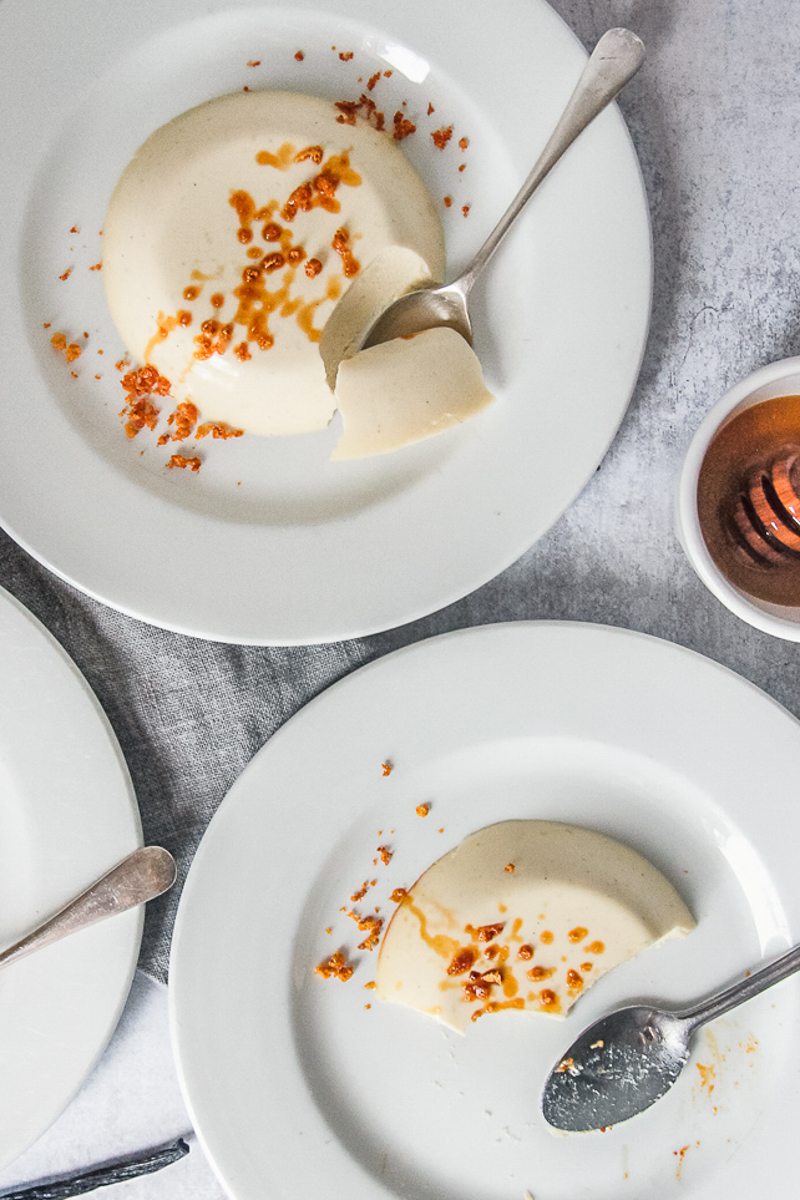
Step 5: Serve up: Invert onto a serving dish and crumble a little of the hokey pokey on top. Serve immediately and enjoy!
FAQ's for the best Manuka and Vanilla Panna Cotta
You will only use a couple of tablespoon amounts for garnishing the dessert so can snack on the leftover portion at leisure or dipped into chocolate for your own homemade Crunchie bites which will help them keep for up to 1 month.
Absolutely! The panna cotta needs time to set so you'll want to let this have a few hours, though, it is best made in the morning and served the same day, you could make and serve it within 24 hours.
Definitely! The honeycomb holds if kept covered in a dry place for 1 week.
Lovely Maryana from The Dalmatian Daughter blog (better known as Mimi to her friends) reached out a few weeks ago and asked if I would be interested in collaborating together...something that I could not say no to.
The planning process led us through a few options of what we could do, but ultimately we decided to make one dish two separate ways, Panna Cotta which is Italian for 'cooked cream' and putting our own spin on it from our respective heritages. Mimi's Instagram has lots of traditional dishes with love for her heritage of Croatian and Turkish food and Mimi made Sour Cherry Panna Cotta that honestly makes me wish we lived closer to each other so I could try this.
More honey recipes you'll enjoy

Manuka and Vanilla Panna Cotta
Ingredients
For the Panna Cotta
- 227 grams / 1 cup cream
- 60 grams / 3 tablespoons milk
- 50 grams / ¼ cup superfine/caster sugar
- 1 teaspoon vanilla seeds
- 21 grams / 1 tablespoon Manuka honey
- ¼ teaspoon sea salt
- 2 leaves gelatin 1 equivalent teaspoon agar agar powder for thick cream
For the Hokey Pokey Crumb
- 60 grams / ⅓ cup + 1 teaspoon superfine/caster sugar
- 42 grams / 2 tablespoons golden syrup
- 5 grams / 1 teaspoon baking soda
Instructions
Panna Cotta
- Soak the gelatin sheets in water until soft.
- Place the cream, milk, sugar, vanilla seeds, manuka honey, salt (if using agar agar add this additionally and cook until it has reached 85C/185F by using a candy thermometer) into a saucepan until the sugar has dissolved and is bubbling and thickened somewhat for 2 minutes.
- Remove from the heat, wring out the soft gelatin sheets and whisk into the hot cream mixture until the mixture has thickened, smooth but still has somewhat of a jiggle.
- Pour into your prepared dishes and place in the refrigerator until set or overnight.
Hokey Pokey Crumb
- Meanwhile, to make the hokey pokey, prepare a baking tray with baking paper and grease with butter or coconut oil (if you don't it will likely stick).
- Place the sugar and golden syrup on low heat into a saucepan and stir until the sugar has dissolved, approximately 2 minutes.
- Increase the heat to medium high and stir while it bubbles for 2 minutes.
- Remove from the heat, add the baking soda and stir swiftly as the mixture bubbles up. Pour quickly into your prepared tin and set aside to set.
- To serve, leave at room temperature, place a plate over the top of the dishes and upend to gently remove from your mould.
- Break a tablespoon amount of hokey pokey and crumble it between your fingers and sprinkle over the top, allowing to sit for a few minutes to melt the hokey pokey a tiny little amount which makes it a little bit of a honeycomb sauce.
- Serve and enjoy!
Notes
- Manuka honey: This has an intense distinctive flavor, however, you could replace with heather or other intense honey that is locally available to you.
- Gelatin: Standard gelatin leaves available at supermarkets was used here, however, you could replace with vegan agar agar powder (this needs to cook until it has reached 85C/185F by using a candy thermometer and whisking after removing from the heat).
- Make ahead: The panna cotta needs time to set so you'll want to let this have a few hours, though, it is best made in the morning and served the same day, you could make and serve it within 24 hours.
Nutrition
Subscribe to receive a free weekly newsletter using seasonal produce as well as exclusive content!
MADE IT AND LOVED IT?
If you have made this recipe, it would mean so much to leave a review below to help more people find this.
Leave a Reply